Are you looking for a way to run Arduino code on ESP8266? In this Instructable, we will guide you through the process of installing the Arduino IDE software for ESP8266. By the end of this tutorial, you will be able to upload and run your Arduino code on ESP8266.

Step 1: Installing Arduino IDE Software
First, you need to install the Arduino IDE software from the official website. You can download the software from http://www.arduino.cc/en/main/software.
Step 2: Arduino IDE Icon
After installing the Arduino IDE software, an icon will be created on your desktop, as shown in the figure.

Step 3: Opening Arduino IDE
Click on the Arduino IDE icon to open the Arduino window, as shown in the figure.

Step 4: Preferences
Open the File and click on the Preferences option, as shown in the figure.

Step 5: Adding ESP8266 Board Manager
To add the ESP8266 board manager, enter the following URL in the Additional Boards Manager: http://arduino.esp8266.com/stable/package_esp8266com_index.json. Click OK to confirm.

Step 6: ESP8266 Board Package(Install
ESP8266 library in Arduino IDE)
Scroll down the Boards Manager window to the bottom until you see the module with the name ESP8266. Select the module, choose the version, and click on the Install button. Once it is installed, it will show "Installed" in the module, as shown in the figure. Then close the window and you have installed the ESP8266 library in Arduino IDE.

Step 7: Selecting ESP8266 Board
To run the ESP8266 with Arduino, select the Board: “Arduino/Genuino Uno” and then change it to NodeMCU 1.0 (ESP-12E Module) or any other ESP8266 modules that you have. You can do this by scrolling down, as shown in the figure.

Step 8: Connecting ESP8266 to the PC
Connect the ESP8266 module to your computer through a USB cable, as shown in the figure. When the module is connected to the USB, the COM port is detected. For example, COM5 is shown in the figure.

Step 9: Selecting COM Port
Click on tools to select the port: “COM” based on which ESP8266 module is connected to your respective COM port of the computer. To select the COM port, refer to the previous steps.

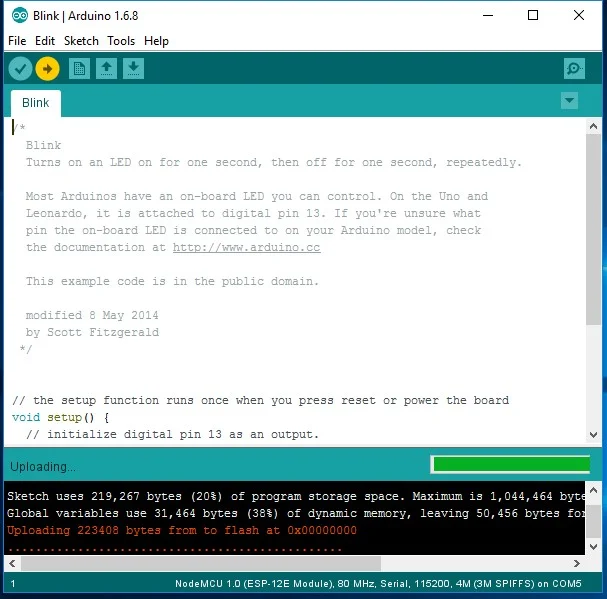
Step 10: Uploading the Program to ESP8266 Module
You can now upload your program to the ESP8266 module.
Your program should work and you can start experimenting plus creating DIY projects with ESP8266 but in case you are still facing issues then you may refer to the below steps:
Step 11: Adding Libraries
If you need to add libraries to the Arduino, follow the example path shown in the figure: C:\Users\LearnElectronicsIndia\Documents\Arduino\libraries. Enter into the libraries folder, then paste the file in that folder.

Step 12: More References
For more information, visit the following links: https://github.com/esp8266/Arduino
Want to learn more about ESP8266 & create amazing DIY Projects then check out these links:
Want to learn about Arduino and create Arduino projects then check out these links:
Want us to help you with the projects, write your inquiry here - Order Projects Check out our Free Arduino Projects Playlist - Arduino Projects Check out our Free Raspberry Pi Projects Playlist - Raspberry Pi Projects Check out our Free TinkerCAD Projects Playlist - TinkerCAD Projects Check out our Free IoT Projects Playlist - IoT Projects Check out our Free Home Automation Projects Playlist - Home Automation Projects Check out our Free NodeMCu Projects Playlist - NodeMCu Projects
Want us to help you with the projects, write your inquiry here - Order Projects
Check out our Free Arduino Projects Playlist - Arduino Projects
Check out our Free Raspberry Pi Projects Playlist - Raspberry Pi Projects
Check out our Free TinkerCAD Projects Playlist - TinkerCAD Projects
Check out our Free IoT Projects Playlist - IoT Projects
Check out our Free Home Automation Projects Playlist - Home Automation Projects
Check out our Free NodeMCu Projects Playlist - NodeMCu Projects
Order Electronics Projects
Want us to guide you through your project or make the project for you? Click on the button below or reach out to us via Call/WhatsApp at (+91) - 7600948607
You can -
Order Basic Electronics Projects
Order Embedded Systems Projects
Order IoT Projects
Order FPGA Projects
Order VLSI Projects
Order Image Processing Projects
Order Matlab Projects
Order TinkerCAD Projects
Order Proteus Projects
Click on the button below to fill out the project inquiry form -
Create Various Projects
Check out our Free Arduino Projects Playlist - Arduino Projects
Check out our Free Raspberry Pi Projects Playlist - Raspberry Pi Projects
Check out our Free TinkerCAD Projects Playlist - TinkerCAD Projects
Check out our Free IoT Projects Playlist - IoT Projects
Check out our Free Home Automation Projects Playlist - Home Automation Projects
Check out our Free NodeMCu Projects Playlist - NodeMCu Projects
Follow us -
Please do follow us i.e. #learnelectronicsindia to get daily updates about new blogs, videos, courses, products, offers, competitions, quizzes, and Internship Opportunities.
LearnElectronics India simplifies complex concepts beautifully. Thank you!
This blog/article was incredibly helpful! The step-by-step instructions provided by Learn Electronics India made it so easy for me to install the ESP8266 library in Arduino IDE. Thank you for simplifying such a crucial process.